
How to Repair a Leaking Water Tank: Plastic and GRP Fixes, and When to Replace
Meta Description: How to find and fix a leaking water tank: leaks at fittings, cracks in plastic and GRP tanks, temporary repairs, when a professional is needed and when it is time to replace the tank.
Target Keyword: How to Repair a Water Tank Leak Secondary Keywords: how to fix a leaking water tank, water tank leakage repair, plastic water tank crack repair, grp tank leak repair, leaking water tank uae, water tank leak at fitting
A leaking tank wastes water, damages floors and foundations, and can let contamination in. The right repair depends on three things: where the leak is, what the tank is made of, and how big the damage is. A dripping fitting is a ten minute job. A split in the wall of a plastic tank is a different story.
This guide helps you find the leak, fix what can be fixed safely, and decide when to replace the tank.

Step 1: Find Out Where the Water Is Coming From
Do not assume the leak is where you see the wet patch. Water runs along surfaces before it drips.
- Dry the tank and the area around it.
- Check the fittings first. Look at the outlet, inlet, drain valve, overflow and any bulkhead connectors. Most tank leaks are here, not in the wall.
- Fill the tank slowly and watch where the first drips appear. A leak that only appears at a certain water level tells you the damage is at that height.
- Check the base. A leak at the bottom edge or under the tank may be from a fitting underneath or a crack that only opens under load.
- Look for pipework leaks. A wet base may be coming from the pipe, not the tank.
Mark the exact point with a pencil or tape.
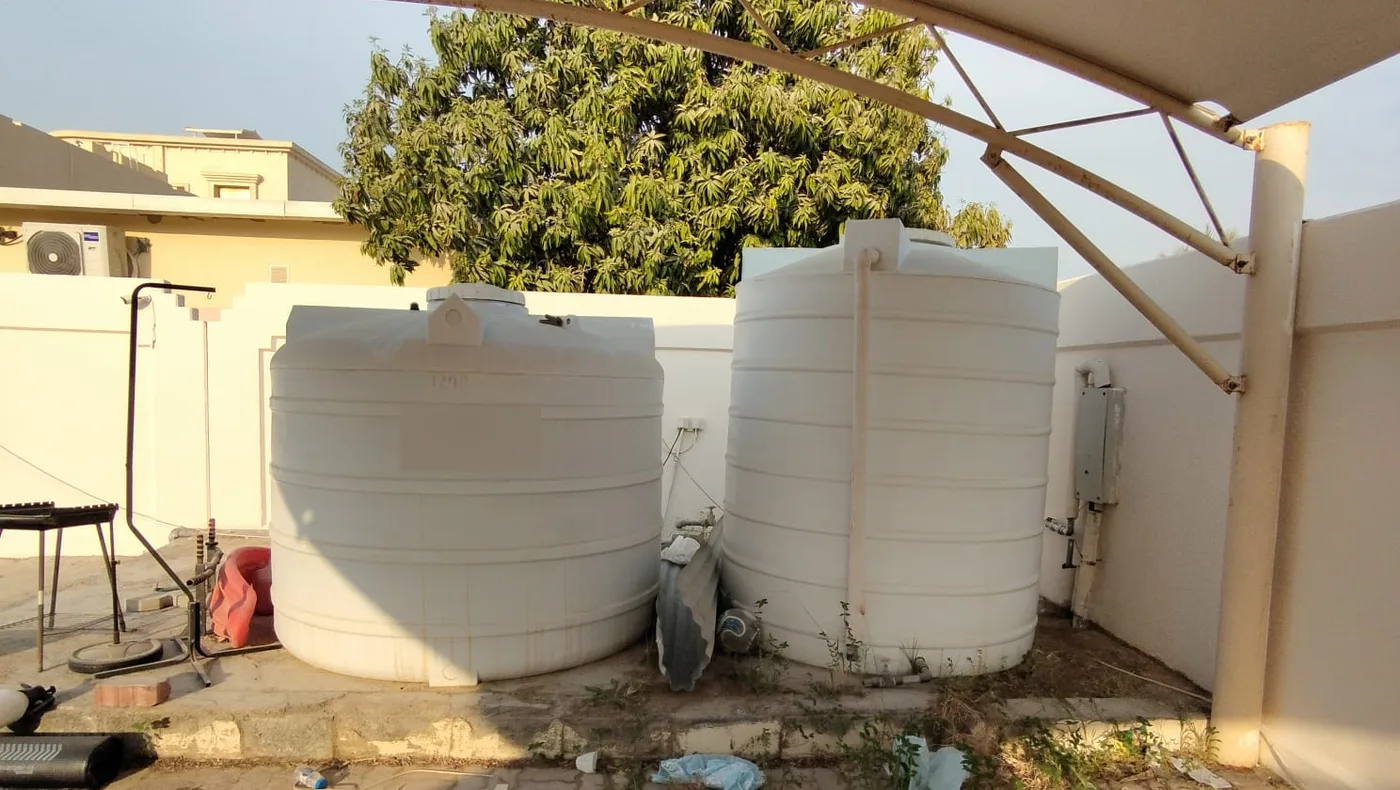
A tidy base makes leaks easy to spot. In the photo at the top of this page, weeds, rubbish and stained concrete around the tanks would hide a slow drip at the outlet or a damp patch under the tank for a long time. Keep the area around and under the tank clear, so any wet spot shows up straight away.
Leaks at Fittings and Connectors
This is the most common and the easiest to fix.
- Loose connection. Tighten by hand, then a small turn with a wrench. Do not over-tighten, which can crack a plastic thread.
- Worn or flat gasket. Drain the tank to below the fitting, undo the connector, replace the washer or gasket and refit.
- Bad thread seal. Clean the thread and rewrap with PTFE tape.
- Cracked fitting. Replace the fitting. Use the right type for the tank wall and make sure the seal faces the water side correctly.
- Pipe strain. If the pipe is pulling on the tank, support it separately and add a flexible connector.
Always turn off the supply and drain the tank below the fitting before you work on it.
Repairing a Plastic (Polyethylene) Tank
Polyethylene is tough, but it is also very hard to glue, because most adhesives do not stick to it. The options are:
- Temporary repair. For a small pin hole or hairline leak, a repair product made for polyethylene, or a bolted rubber patch with a gasket on a dry, clean surface, can hold for a time. Treat it as temporary.
- Plastic welding. A trained technician can melt a patch or filler rod of the same plastic into the damaged area using hot air or an extrusion welder. This is the proper permanent repair for small cracks, and gives the best result when the damage is small and the tank is clean and dry.
- Replacement. Large cracks, damage at stress points, brittle or sun-damaged walls, and splits at the base are usually better solved by replacing the tank.
Avoid household sealants and epoxy not rated for potable water and polyethylene. They may not bond, and they may contaminate the water.
Repairing a GRP (Fiberglass) Tank
GRP can be repaired because resin bonds well to resin. The standard method is:
- Drain and dry the tank completely. The surface must be dry.
- Mark and grind the area around the damage with a sander, back to clean, rough GRP. Taper the edge of the crack.
- Clean with a solvent suitable for GRP and let it dry.
- Apply resin and glass fibre mat in layers over the damaged area, working out the air bubbles. Overlap the sound material by several centimetres.
- Let it cure fully, following the resin manufacturer's instructions.
- Finish the inside surface with a food-grade gel coat or lining where it touches drinking water.
- Test by filling slowly and checking for leaks.
This is a skilled job, and for a potable water tank the materials must be suitable for contact with drinking water. For anything beyond a small patch, use a specialist.
When It Is Time to Replace the Tank
Repair stops being sensible when:
- The tank has multiple cracks or a crack that keeps coming back.
- The wall is brittle, chalky or faded from years of sun, which means the material is ageing.
- The base or bottom is damaged, because this is where the load is highest.
- The repair cost is a large share of a new tank.
- You cannot be sure the repair is safe for drinking water.
- The tank is unstable or distorted, for example from an uneven base.
A new tank on a proper base avoids repeating the failure. See our PVC plastic tanks and GRP fiberglass tanks, and for urgent cases our emergency tank replacement service.
Safety and Water Quality Notes
- Drain and isolate before any repair. Never work on a pressurised tank.
- Do not enter a closed tank without ventilation and a second person outside.
- Use materials rated for drinking water inside a potable tank.
- Disinfect after a repair, before the tank goes back into service. See our cleaning guide.
- Dispose of old tanks responsibly, and do not reuse a damaged tank for drinking water.
How to Prevent Leaks in Future
- Put the tank on a flat, level, fully supported base. An uneven base is a leading cause of cracking.
- Support the pipework separately and use flexible connectors.
- Protect the tank from the sun where you can.
- Use the right fittings and do not over-tighten.
- Check the tank regularly for damp patches, weeping fittings and bulges.
- Allow space for inspection around the tank.
Frequently Asked Questions
How do I repair a leaking water tank?
Find the exact source first. Most leaks are at fittings and are fixed by tightening, replacing a gasket or resealing the thread. Cracks in the wall need a repair that suits the material.
Can I fix a crack in a plastic water tank?
Small cracks can be repaired by plastic welding by a technician, or temporarily with a polyethylene repair product. Large cracks, and damage at the base, usually mean replacing the tank.
What glue works on a polyethylene water tank?
Very few adhesives bond to polyethylene. Welding is the proper method, and a temporary patch should only be used where a permanent repair is not possible.
How do I fix a leaking water tank fitting?
Drain the tank below the fitting, tighten it, or replace the gasket, and reseal the thread with PTFE tape. Replace the fitting if it is cracked.
Can a GRP tank be repaired?
Yes. GRP can be ground back and patched with resin and glass fibre mat, with a food-grade finish on the inside for drinking water.
Is it safe to drink water from a repaired tank?
Only if the repair materials are suitable for drinking water and the tank has been cleaned and disinfected afterwards.
How long does a repair last?
A proper weld or GRP repair can last for years if the cause is fixed. A temporary patch may fail within weeks or months.
Why does my tank leak at the bottom?
Common causes are a bottom fitting, a crack from an uneven base, or damage from dragging. Find the source before you decide whether to repair or replace.
Related Resources
- How to Clean a Water Tank: Step-by-Step Guide
- GRP Water Tank Delivery and Installation
- Emergency Water Tank Replacement UAE
- PVC Plastic Water Tanks
- GRP Fiberglass Water Tanks
📞 Call or WhatsApp: +971509583173 ✉️ Email: khazzanae@gmail.com 🌐 khazzan.ae 📍 Al Qouz Industrial Area 3, Dubai, UAE 🕐 Monday to Saturday, 8AM to 7PM